How to operate Wallside sliding window screens
All Wallside sliding windows installed after March 14, 2016 feature FlexScreen - the world's first flexible window screen! We also have instructions for operating aluminum screens found on our sliding windows installed prior to 2016.
Full Screen FlexScreen
Half Screen FlexScreen
Operation of aluminum screens for windows installed before March 14, 2016
Lift Out Slider Screen Operation
Tilt and Slide Screen Operation
Helpful hints: spring clips…and screen clips

Screens are held in place with hidden spring clips on top. Remove screens from inside home.

Some windows with two half-screens have screen clips which must be removed before either screen can be removed. Replace these clips after replacing screens.
Screen removal
Remove left screen first…

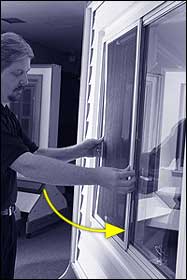
Grasp ridge of lower left corner of screen, push up—compressing top spring clips, and push out simultaneously.

Grasp bottom and right edges of screen and press upward to compress top spring clips while pushing out screen bottom.
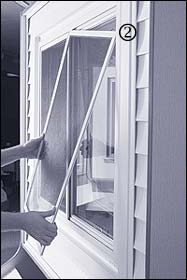
…then remove right screen.

Slide screen to left, to clear right side track.
Grasp edge of screen, lifting to compress top spring clips while pushing out from bottom.
Screen replacement
If window has one screen, it can be replaced from inside home. For two screens, replace from outside home.
Replace left screen first...

Press top squarely into track (compressing top spring clips).
Push bottom of screen in, flush with track, and release.

Slide fully left.
... then replace right screen

Insert top left corner into top track.
Angle screen to fit top right corner into side track.

Rotate screen to fit top into track.

While pressing screen up to compress top springs, insert lower right corner.

Press in bottom edge and pop in lower left corner.

Top left corner, top right corner, lower right corner, lower left corner.
